 The only thing worse than buying a used bike and finding that its missing parts is not being able to figure out exactly which parts are missing or how they install on the bike. That's where parts diagrams come in handy. Thankfully Kawasaki has released the parts diagrams for the KLR250 to the public so anyone can see how their bike is supposed to be assembled. Below you'll find all the part diagrams for the Kawasaki KLR250. Some part numbers may have changed from year to year so its best to check with your local dealer before order parts for your bike.
Friday, April 16, 2010
Kawasaki KLR250 Parts Diagrams
The only thing worse than buying a used bike and finding that its missing parts is not being able to figure out exactly which parts are missing or how they install on the bike. That's where parts diagrams come in handy. Thankfully Kawasaki has released the parts diagrams for the KLR250 to the public so anyone can see how their bike is supposed to be assembled. Below you'll find all the part diagrams for the Kawasaki KLR250. Some part numbers may have changed from year to year so its best to check with your local dealer before order parts for your bike.Wednesday, April 14, 2010
Kawasaki KLR250 FAQ
 What was changed from 85-05?
For the most part the KLR 250 has remained the same throughout its life. There have been numerous paint and plastic color changes as we documented here. There were also a few changes to the engine such as the left crankshaft bearing being replaced with a more durable one betwen '89-'90 and a few changes to the intake camshaft profile.
Where can I get a manual
Sadly the two major service manual publishers, Clymer and Haynes, have never created a manual for the KLR250. For some engine work you could use the manual they made for the Mojave ATV but that won't do you much good when you need to work on the rest of the bike. The only true option is a service manual by Kawasaki. Unfortunately Kawi didn't make things easy (or cheap!) for us KLR250 owners as they require you buy two of their manuals to get full coverage on this bike. The KLR600 manual (part #99924-1050-01) is known as the base manual and includes the majority of information needed for the KLR250. However you'll also need the KLR250 supplement manual (part #99924-1051-15) which covers more KLR250 specific topics. You can purchase these manuals for $34.95 each straight from Kawasaki.com or you might want to keep an eye on ebay. EDIT: Thanks to a few members of the KLR650.net forums both KLR250 repair manuals are available in PDF format here. Edit: Sorry but it looks like the file was taken down
How fast do they go?
A good running KLR250 will happily go about 70 mph for extended lengths of time. With that said some owners have reported being able to go 90+ mph under the right conditions.
What kind of fuel mileage can I expect?
The KLR250 is said to get around 70 mpg but that can vary drastically depending on the speed, rider weight, tire choice, riding conditions, jetting, etc. You'll find most owners get around 55-65 mpg.
What aftermarket parts are available?
Unfortunately there aren't many aftermarket parts and accessories made for the KLR250. Below is a list of what parts we could find.
- Racks: Moose Racing makes a strong steel rack for the KLR250. Dual Star and Cycleracks.com (pic) both make good rear racks for the KLR250. Turbo City also makes a range of racks and guards for this bike.
- Exhaust: A while back Supertrapps made an exhaust for the KLR 250 but we have been notified by them that it is no longer available. The only two out of the box options are from FMF, with their Q4 exhaust system, and a "CZR" brand exhaust system (pic) that is sold on ebay.
- Skid Plate: Utah Sports Cycle makes the aluminum Ricochet skid plate. (pic) As far as we know this is the only aftermarket skid plate available to replace the KLR250's weak stock piece.
- Handlebars: The KLR250 uses regular 7/8" handlebars. That means that the majority of motorcycle handlebars made will fit on this bike. However handlebars do come in many different bends so you'll want to find one that best fits your needs. From our experience the cr-high bend handlebars are very close to the same dimensions as the stockers. However some owners find that the atv-high bend bars are taller giving a more upright riding position.
- Fuel Tank: IMS makes a slightly larger plastic fuel tank for the 250. It is 3.2 gallons compared to the 2.9 gallon stocker.
- Suspension: Progressive Suspension makes upgraded springs for the forks and a spring for the rear. Cogent Dynamics also makes a rear shock. Although the KLR250 has a relatively low seat height to begin with Koubalink makes lower links for those who are altitude challenged.
- Other: Although there aren't many engine upgrades available specifically for the KLR250, Cycle Works Racing makes numerous upgrades for the Mojave ATV which will also fit the KLR including big bore kits and cams.
The US version of the KLR250 comes with either a 118 or 120 main jet and a 35 pilot jet. From the factory the KLR250 is jetted fairly lean so even if you aren't planning any mods its a good idea to change to a slightly richer main jet. For stock exhaust/airboxes most people will stick with the stock 35 main jet and upgrade to a 122 main. For modified or aftermarket exhaust systems and cut airboxes you'll probably want to go up to a 38 or even 40 pilot while using a 125 or 127 main jet. Just remember that what jets you use really depend on your particular situation, which exhaust you used, how much you hacked up the airbox, and what altitude you ride at. Just because a 127 works for a guy at sea level doesn't mean you'll need that large of a main jet at 12,000 feet.
As for where to get the jets you have multiple options. You can check with your local Kawasaki dealer, or order them online. We have personally ordered from Jetsrus.com and had the proper jets delivered in just a matter of days. Many recommend Ronayers.com as well.
Is it true that the Mojave ATV shares the same engine/tranny?
Yes and no. The KLR and Mojave have very similar engines but there are distinct differences. The most obvious is the transmission, while the KLR has a six speed tranny, the Mojave has a five speed with reverse. The heads of the engines are basically identical but the parts used in each vary from year to year. Check out the camshaft part numbers below and you'll see what I mean. Not only did Kawasaki use different cams in the KLR through the years but the Mojave had its own specific cams as well.
KLR250 Cam Part Numbers
-Intake
85-86 #12044-1351
87-92 #12044-1119
93-05 #12044-1351
-Exhaust
85-05 #12044-5006
Mojave ATV Cam Part Numbers
-Intake
87-93 #12044-1181
94-04 #12044-1348
-Exhaust
87-93 #12044-5007
94-95 #12044-5009
96-04 #12044-1427
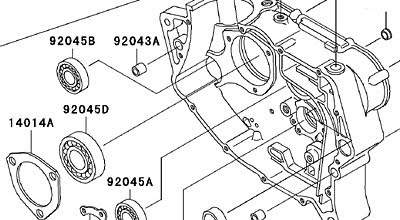
Whats this I hear about an oil screen?
The oil screen is located behind the right side engine cover. It catches large debris that would normally get into the oil pump. It is strongly suggested that you check this screen because some owners have reported finding large amounts of rubber gasket debris clogging up the screen which can result in oil starvation. To get to the screen you'll need to drain the engine oil and antifreeze, then remove the brake pedal, water pump cover, water pump impeller, clutch cable, clutch lever (that goes into the case) and finally the right side cover. You'll find the screen located toward the bottom of the engine under the clutch. Removing the side cover usually requires a new gasket for the cover and water pump.
Kawasaki KLR 250 Carb Cleaning Information
 If you were to browse any KLR250 related forum the most common ailment you'd hear owners complain about is some type of starting or running problem, usually carburetor related. These problems aren't biased to just the KLR, any carbureted bike can experience them. They're usually due to dirt in the fuel clogging a jet, or varish gumming everything up. The only solution is to remove the carb from the bike and give it a thorough cleaning and inspection. Thats what this article is meant to do, show you the basics of the KLR250 carburetor and give a quick run through on how to clean it.We won't get into how a carb works, but if you're interested in learning more check out The Care and Feeding of the Keihn Carb.
 The KLR 250 comes with a Keihn CVK34 carburetor. Don't let the parts diagram to the left fool you, CVK34 is a very simple design. To clean the carb you'll need to remove it from the bike. Probably one of the more painful processes whenever you have to work on your bike's carb is trying to get it out of the bike. At the very least it'll require removing the side plastics, seat, and fuel tank, though we have found that unbolting the exhaust muffler and the top bolts of the subframe (the part the seat bolts to) make things easier by allowing you to pivot the entire subframe backwards giving better access to the carb. Once you've gotten to the carb follow these steps to disconnect and remove it.
Removal:
1. Turn off the fuel petcock on the fuel tank
2. Place a container under the fuel drain hose. That is the hose which leads from the fuel drain screw to just in front of the rear wheel.
3. Open drain screw, located on the bottom right side of the carb (on the float bowl) and allow all of the fuel to drain from the carb.
4. Remove the fuel line from the left side of the carb (black rubber line from the fuel tank)
5. Remove the throttle cables, one screw holds the bracket in place.
6. Carefully unscrew the plastic choke cable nut from the left side of the carburetor. This is where the choke cable screws into the carb. The plastic nut is very fragile so be careful!
7. Loosen the clamp on the front side of the carb holding it to the engine.
8. Remove the rear carb to airbox tube
OK now you should have the carb out of the bike and holding it in your hands. Next step is tearing it down while being very careful not to lose or damage anything in the process.
 Teardown:
1. Remove the four screws on the plastic piece on the top of the carb. Underneath there should be a diaphragm, spring, slide, needle and white piece of plastic. Make a mental note of the order of those parts (slide, needle, white plastic piece, spring) and remove them. Be careful not to tear the rubber diaphragm.
2. Remove the float bowl. That is the metal bowl on the bottom of the carb, held in place with four screws. Be careful when removing it as the float and needle valve can fall out. Make a note of the position of the float and needle and remove them.
3. Next step is to unscrew the main and pilot jets from the carb body. (see diagram above for their location)
Pilot Screw Info:
The KLR's carb has a pilot mixture screw which controls the amount of fuel that enters the engine while at idle. However to stop owners from fiddling with it Kawasaki covered the screw with a small tin cap. The only way to get to this screw is to carefully drill a small hole in the tin cap and then pry it off with a small screw driver. The utmost care must be taken so you don't screw all of the way through to the pilot screw itself. Once the screw is accessible then you can remove it. There should be an o-ring, washer, and spring on the end of it, note their order and set them to the side.
Cleaning:
Thats about all you need to disassemble. Wasn't that hard was it? Now its time to clean everything. Just about everyone has their own way of doing this but what we suggest is buying a few bottles of carb cleaner (the kind you pour in your car's fuel tank) and a couple cans of spray type carb cleaner that have the small plastic tubes on them. Fill a small container with the carb cleaner (bottle type) and soak all of the metal parts in it, including the carburetor body. Note: Do not use either carb cleaner on any plastic or rubber parts, it'll eat them. What you're trying to accomplish is the removal of all varnish from inside the carb body, and jets. After they've soaked for a couple of hours its time to spray out all of the small passages in the carb body, and the tiny holes in jets with the spray type carb cleaner and then follow it up with a blast of compressed air. You're trying to make sure there is nothing clogging up those small holes, you leave one grain of sand behind and you'll be doing this again so be diligent! By this point you should have a sparkling clean carburetor, all that is left to do is reassemble everything.
Reassembly:
There isn't much to say here, just reassemble everything in the reverse order you took it apart. When the time comes to re-install the pilot screw make sure the o-ring, washer, and spring are in place and screw it in all of the way and back out two full turns. (further adjustment may be needed but this is a good starting point) When you re-install the slide components be careful not to pinch or tear the rubber diaphragm.
 Float Adjustment:
While you have the carb apart and cleaned this is the perfect time to check the float height adjustment. Simply install the float and needle valve onto the carb body and hold it as shown in the diagram to the left. You want the needle to be lying on its seat but not pushed down. To check for proper adjustment measure from the float bowl mating surface, and the top of the float. (4) The adjustment should be 17mm. If you find its not 17mm then you correct it by ever so slightly bending the float bowl tang with a pair of needle nose pliers. (see arrow in this picture) Small adjustment result in big changes in the float height, so go easy. Once you've got it to 17mm you're all set.
Thats it! Now re-install the carb back in the bike and you're good to go!
Image Sources: Gadjetjq.com - KLR650.net - Kawasaki.com
Note: The top image is of a CVK40. While it is a different carburetor than the CVK34 in the KLR 250 their layouts are almost identical.
KLR 250 Wiring Diagram
 Trying to figure out why your KLR250's headlights no longer work or your turn signals stopped blinking? One of the most commonly asked for items in any KLR forum is for a wiring diagram. Its not that the KLRs had a lot of electrical problems, rather its more about some of these bikes being over 20 years old. In that time connections corrode and switches wear out, and the only way to diagnose the electrical bug your bike has is by using a wire diagram. Anyway, enough talking, just click the image to the left to enlarge it.
Subscribe to:
Posts (Atom)

